Your First Render Deploy
Run your web app in minutes.
Welcome! Let's get up and running on Render.
This tutorial uses free Render resources. No payment is required. All you need is a GitHub, GitLab, or Bitbucket repository with the web app you want to deploy.
Want to deploy an example app using a particular language or framework?
Check out our quickstarts.
1. Sign up
Signing up is fast and free:
2. Connect your Git provider
You can deploy to Render from GitHub, GitLab, and Bitbucket.
-
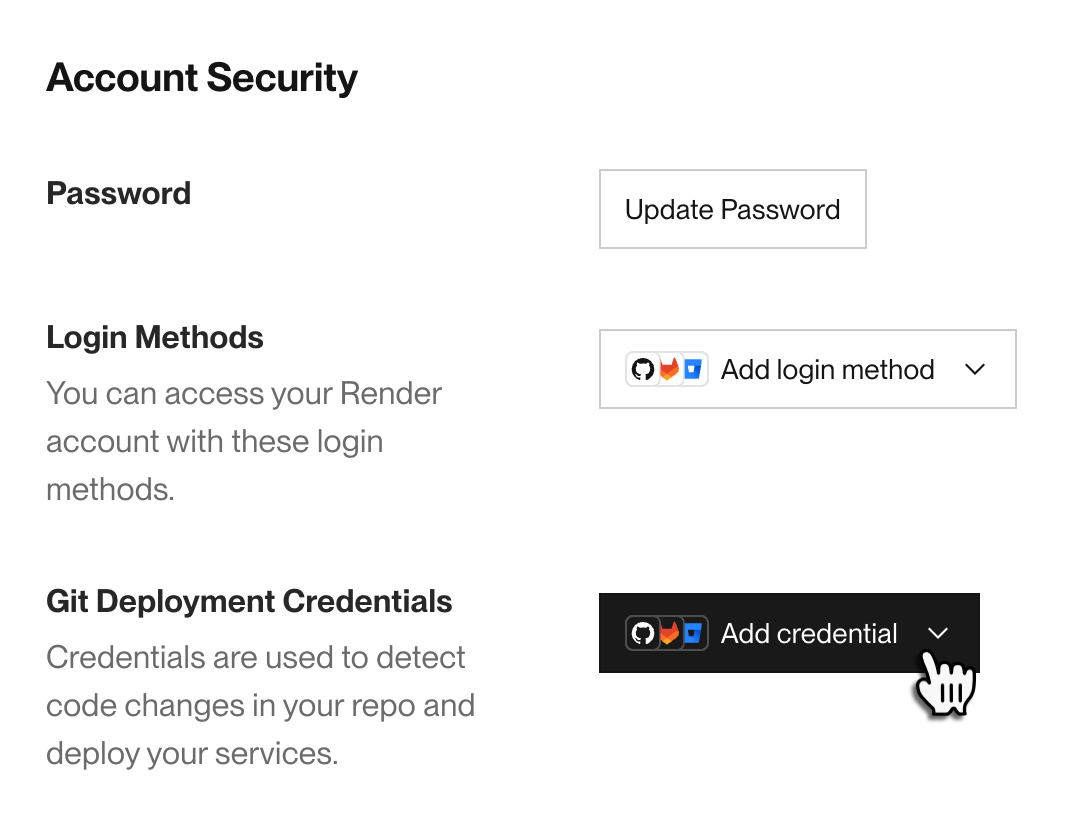
Open your Account Settings page and scroll down to the Account Security section:
-
Under Git Deployment Credentials, click Add credential and authorize Render with your provider.

3. Choose a service type
To deploy on Render, you create a service that pulls, builds, and runs your code.
For this tutorial, you'll create a Web Service or a Static Site:
| Service type | Description | Common frameworks |
|---|---|---|
|
Web Service |
Choose this if your web app runs any server-side code. The app also needs to listen for HTTP requests on a port. Full-stack web apps, API servers, and mobile backends are all web services. |
Express, Next.js, Fastify, Django, FastAPI, Flask, Rails, Phoenix |
|
Static Site |
Choose this if your web app consists entirely of static content (mostly HTML/CSS/JS). Blogs, portfolios, and documentation sets are often (but not always) static sites. |
Astro, Hugo, Docusaurus, Next.js static exports |
You can deploy either of these service types for free on Render.
Free web services "spin down" after 15 minutes of inactivity.
They spin back up when they next receive an incoming HTTP request or new WebSocket connection. Learn more about free instance limitations.
4. Deploy your code
You can deploy using the Render Dashboard, the Render CLI, or a coding agent like Codex or Claude Code.
Select the tab for your preferred deployment method:
1. Connect your repo
-
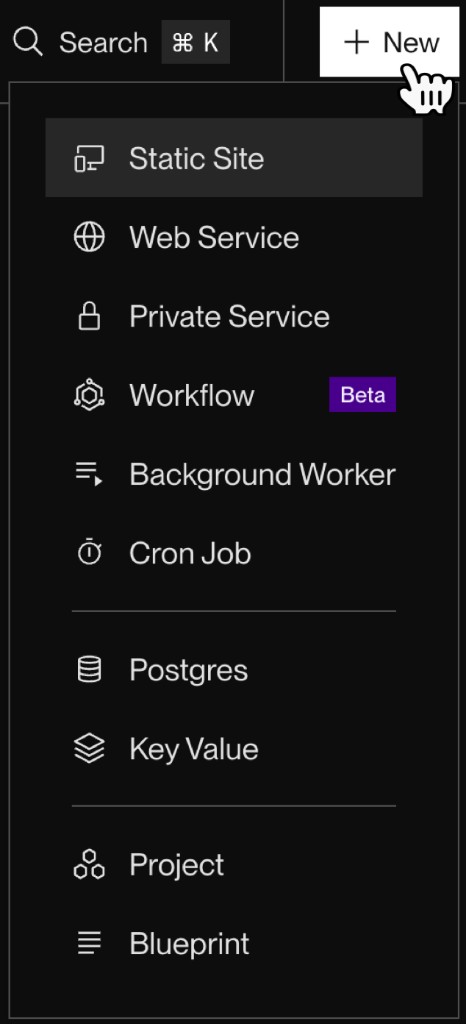
In the Render Dashboard, click + New in the top-right corner and select Web Service or Static Site:
The service creation form appears, showing a list of all the repos you have access to:
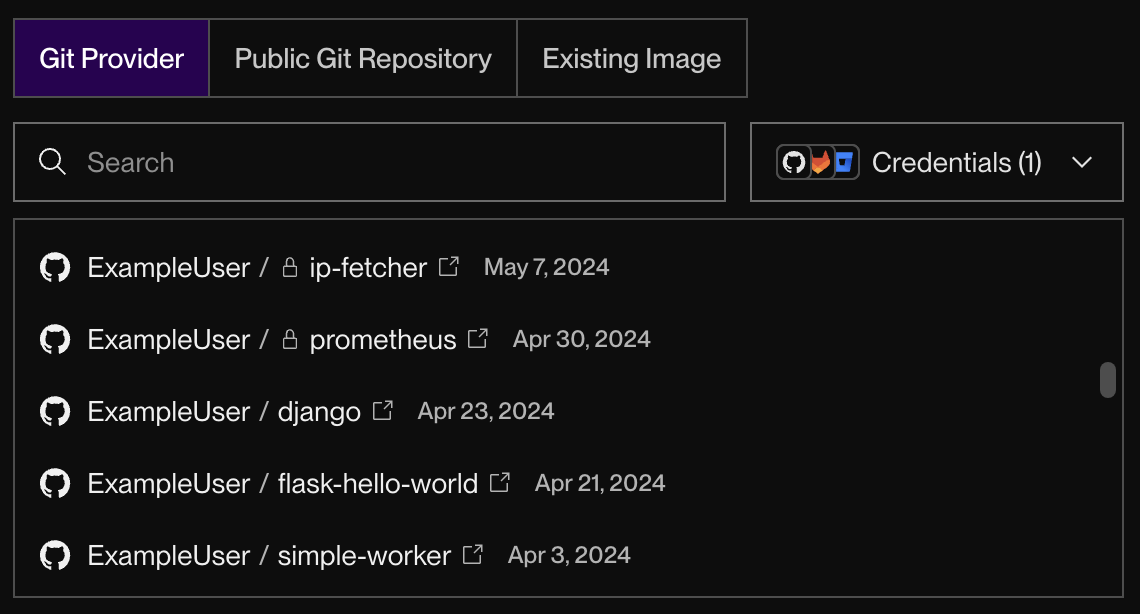
If you haven't connected your Git provider yet, you can do so from this form.
-
Select the repo that contains your web app and click Connect.
The rest of the creation form appears.


2. Configure deployment
Complete the service creation form to define how Render will build and run your app.
Click the tab for your service type to view important field details:
Web service fields
| Field | Description |
|---|---|
|
Branch |
Your service only deploys commits on the Git branch you specify, such as Render can automatically redeploy your app whenever you push changes to this branch. |
|
Root Directory |
Deploying from a monorepo? Specify the subdirectory that represents your application root. Your build and start commands will run from this directory. |
|
Language |
If your app's programming language isn't listed in this dropdown, you can still deploy using the |
|
Build Command |
This is the command that Render will use to build your app from source and install dependencies. Common examples include: You can also use You can also use This usually resembles the command you run locally to install dependencies and perform any necessary compilation. |
|
Start Command |
This is the command that Render will use to start your app. Common examples include: You can also use For some frameworks, this might differ from the command you run locally to start your app. For example, a Flask app might use |
|
Instance Type |
This determines your service's RAM and CPU, along with its cost. Choose the Free instance type to deploy for free:
|
|
Environment Variables |
These will be available to your service at both build time and runtime. If you forget any, you can always add them later and redeploy. |

Static site fields
| Field | Description |
|---|---|
|
Branch |
Your site only deploys commits on the branch you specify, such as |
|
Root Directory |
Deploying from a monorepo? Specify the subdirectory that represents your application root. Your build command will run from this directory. |
|
Build Command |
This is the command that Render will use to install dependencies and then build your site's static assets. Common examples include: For Next.js, make sure you've set |
|
Publish Directory |
This is the directory containing your site's static assets, which are usually generated by your build command. Common examples include:
|
|
Environment Variables |
These will be available to your service at build time. Additionally, some static site generators substitute environment variable values into your generated static assets. For example:
If you forget any, you can always add them later and redeploy. |
When you're done, click the Deploy button at the bottom of the form.
That's it! Render creates your service and kicks off your first deploy.
1. Install the CLI
Use any of the following methods to install the Render CLI or upgrade to the latest version:
Run the following commands:
Run the following command:
- Open the CLI's GitHub releases page.
- Download the executable that corresponds to your system's architecture.
If you use an architecture besides those provided, you can build from source instead.
We recommend building from source only if no other installation method works for your system.
-
Install the Go programming language if you haven't already.
-
Clone and build the CLI project with the following commands:
After installation completes, open a new terminal tab and run render with no arguments to confirm.
2. Log in
Run the following command to authenticate:
Your browser opens a confirmation page. Click Authorize CLI, then return to your terminal and select your workspace when prompted.
For details, see the CLI setup guide.
3. Create a service
Use render services create to create and deploy a new service via the Render CLI. For example, the following command deploys a Node.js web service:
Select the tab for your service type to learn which CLI options to supply:
| Option | Description |
|---|---|
|
|
A name for your service (appears in the Dashboard and your |
|
|
Set to |
|
|
The Git repository URL for your app. For private repos, first connect your GitHub, GitLab, or Bitbucket account. |
|
|
Your app's runtime environment ( |
|
|
This is the command that Render will use to build your app from source and install dependencies. Common examples include This command resembles the command you run locally to install dependencies and perform any necessary compilation. |
|
|
This is the command that Render will use to start your app. Common examples include For some frameworks, this might differ from the command you run locally. For example, a Flask app might use |
|
|
Environment variables are available to your service at both build time and runtime. Repeat the flag for multiple variables. If you forget any, you can always add them later and redeploy. |
|
|
Determines your service's RAM and CPU, along with its cost. Provide |
For the full list of options, see the services create reference.
| Option | Description |
|---|---|
|
|
A name for your site (appears in the Dashboard and your |
|
|
Set to |
|
|
The Git repository URL for your site. For private repos, first connect your GitHub, GitLab, or Bitbucket account. |
|
|
This is the command that Render will use to install dependencies and build your site's static assets. Common examples include This command resembles the command you run locally to install dependencies and build your site. |
|
|
The directory containing your built static assets, usually generated by your build command. Common examples include:
|
|
|
Environment variables are available to your site at build time. Some static site generators substitute them into your generated assets, for example:
Repeat the flag for multiple variables. If you forget any, you can always add them later and redeploy. |
|
|
By default, Render automatically redeploys your site whenever you push to your linked branch. Set to |
For the full list of options, see the services create reference.
That's it! After running render services create, Render creates your service and returns its ID. You'll use this ID to monitor your deploy in the next step.
You can deploy to Render directly from coding agents like Codex and Claude Code using Render's official agent skills.
1. Install the Render CLI
The Render CLI makes it quick to install skills in your coding agent.
Use any of the following methods to install the Render CLI or upgrade to the latest version:
Run the following commands:
Run the following command:
- Open the CLI's GitHub releases page.
- Download the executable that corresponds to your system's architecture.
If you use an architecture besides those provided, you can build from source instead.
We recommend building from source only if no other installation method works for your system.
-
Install the Go programming language if you haven't already.
-
Clone and build the CLI project with the following commands:
After installation completes, open a new terminal tab and run render with no arguments to confirm.
2. Install the render-deploy skill
Run the following command to install skills to deploy and debug your service:
Replace claude with any of codex, cursor, or opencode as needed.
Select a scope when prompted, then restart your coding agent to load the new skills.
Deploy with a prompt
Deploying a private repo?
First connect your GitHub, GitLab, or Bitbucket account in the Render Dashboard.
Open your coding agent and prompt it to deploy your app. For example, the following prompt deploys a Python web service:
Deploy a web service named "my-service" from https://github.com/render-examples/flask-hello-world on Render using the free plan.
Your coding agent analyzes your repository, determines the appropriate build configuration, and deploys your service on Render.
You can include additional details in your prompt, such as environment variables or a specific branch to deploy. If you forget anything, you can always update your service later with another prompt.
5. Monitor your deploy
In the Render Dashboard, open your new service's page to see a log explorer showing your deploy's progress:

Follow along as the deploy proceeds through your build and start commands.
-
If the deploy completes successfully, the deploy's status updates to Live and you'll see log lines like these:
-
If the deploy fails, the deploy's status updates to Failed. Review the log feed to help identify the issue.
- Also see Troubleshooting Your Deploy for common solutions.
- After you identify the issue, push a new commit to your linked branch. Render will automatically start a new deploy.
Stream your deploy's logs in real time with render logs:
Follow along as the deploy proceeds through your build and start commands.
-
If the deploy completes successfully, you'll see log lines like these:
-
If the deploy fails, review the log output to help identify the issue.
- Also see Troubleshooting Your Deploy for common solutions.
- After you identify the issue, push a new commit to your linked branch. Render will automatically start a new deploy.
Prompt your coding agent to check on your deploy. For example:
Show me the deploy status and logs for my-service
Your coding agent retrieves the deploy status and logs.
-
If the deploy completes successfully, your coding agent reports the service as live and returns the URL to open it in your browser.
-
If the deploy fails, ask your coding agent to help diagnose the issue:
Why did the deploy for my-service fail?
Also see Troubleshooting Your Deploy for common solutions. After fixing the issue, prompt your coding agent to redeploy, or push a new commit to your linked branch to trigger a redeploy automatically.
6. Open your app
After your app deploys successfully, you're ready to view it live.
Every Render web service and static site receives a unique onrender.com URL. You can find this URL on your service's page in the Render Dashboard:

Click the URL to open it in your browser. Your service will serve the content for its root path.
Congratulations! You've deployed your first app on Render 🎉
Next steps
Connect a datastore
Render provides fully managed Postgres and Key Value instances for your data needs. Both provide a Free instance type to help you get started.
Free Render Postgres databases expire 30 days after creation.
You can upgrade to a paid instance at any time to keep your data. Learn more about free instance limitations.
Learn how to create datastores and connect them to your app:
Paid services can also attach a disk for persistence of local filesystem data (by default, local filesystem changes are lost with each deploy).
Install the Render CLI
The Render CLI helps you manage your Render services right from your terminal. Trigger deploys, view logs, initiate psql sessions, and more.
Get started with the Render CLI.
Add a custom domain
Each Render web service and static site receives its own onrender.com URL. You can also add your own custom domains to these service types. Learn how.
Learn about operational controls
Deploying your app is just the beginning. Check out a few of the ways you can manage and monitor your running services on Render:
- Scaling your instance count
- Analyzing service metrics
- Rolling back a deploy
- Enabling maintenance mode
Note that some of these capabilities require running your service on a paid instance type.
Explore other service types
In addition to supporting web services and static sites, Render offers a variety of other service types to support any use case:
| Service type | Description |
|---|---|
|
Run servers that aren't reachable from the public internet. | |
|
Offload long-running and computationally expensive tasks from your web servers. | |
|
Run periodic tasks on a schedule you define. | |
|
Define collections of composable, long-running tasks that execute across distributed compute. |
Note that free instances are not available for these service types.
Use this flowchart to identify the right service type for your use case: